QUESTION:
How do I tell if my solenoid is not working? Can you give me some pointers?
G.D. from Nashville
ANSWER:
Next to batteries, the most misunderstood part of a gas or electric car is the solenoid. A solenoid is nothing more than a switch. Switches are normally mechanically activated devices similar to a light or key switch. These types of switches require manual or mechanical activation. Solenoids are just switches activated by an external electrical input. A solenoid’s sole purpose is to make and break an electrical circuit on demand. The term “contactor” is also used to describe a solenoid. A solenoid has two basic circuits, the Primary and Secondary circuit. In the Primary, or activation circuit, you have two components, the activation wiring and the internal primary coil. When subjected to electric voltage the internal primary coil activates, bringing two contact points together to allow an electric current to pass through the Secondary circuit. The coil requires both the positive and negative potentials for electric voltage to pass through it and activate. Most cars activate the solenoid with normal battery pack voltage. However, be aware there are some older model cars that use a system of “tapped” voltage and the solenoid must be connected to a specific voltage. Taps are just different connecting points on the battery pack. The Secondary, or power circuit, is the circuit being activated by the solenoid coil. This circuit consists of large power contacts inside the solenoid that allow a heavy load of electric current to flow to the motor or starter/generator when activated. Any time you are working with a car’s electrical system, be sure you have the correct wiring diagram for the application you are testing! In the accompanying diagram, the connection terminals on the solenoid have been numbered 1 though 4 for ease of identification purposes only.
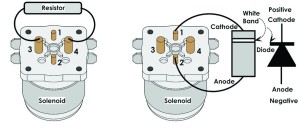
In the diagram, there are some other items that may or may not be on your car system, a diode and resistor. Not all applications use the diode and resistor, and that is why it is important to determine the year, make, and model of your car.
The diode functions as a buffer to catch voltage spikes in the Primary circuit. The resistor (250 ohms) is used to pre-charge the capacitor bank in the car controller if it uses this system. The resistor will connect to the Secondary circuit’s large terminals. Again, use the correct diagram for the system you are working on.
Now let’s talk trouble shooting!
 1) The car will not run.
A) Does the solenoid make a “clicking” sound?
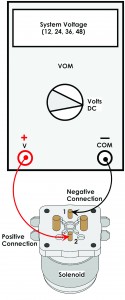
If it doesn’t, we must first determine if activation voltage is present at the small terminals #1 and #2. Connect a voltmeter across the connections at #1 and #2 and activate the system. To activate the system put the car in the run mode, key switch on, car in forward and the accelerator pedal pushed. If your voltmeter displays the system voltage and the solenoid does not “click”, then the solenoid is defective and will need to be replaced.
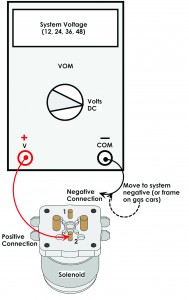 B) The solenoid does not “click” and you do not read system voltage. This tells us
that one of the voltage potentials is missing at connection #1 and or #2. To find out which potential is missing, leave the red lead of the voltmeter connected on terminal #2, the positive connection (usually a blue or red wire). However, wire colors may vary. Ensure proper diagnosis by using the correct diagram for the make and year of your car. Place the black lead of the voltmeter to the battery’s negative post on the number six battery (the last battery in series from the first positive battery connection to the car). Activate the system as before, if your voltmeter reads system voltage, the positive input is correct. This means the key switch, micro switches and wiring are good and you are missing the negative input.
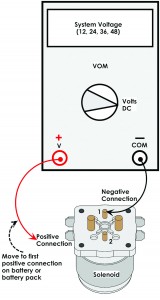 Continue the diagnosis process by connecting the black negative lead from the voltmeter to terminal #1 and the red lead of the voltmeter to battery #1’s positive post (the first positive connection to the car). Activate the system again. If you are not reading system voltage on your voltmeter, you have confirmed that the battery negative is missing. Depending on the system the car is using, the missing negative will need to be traced to its source. Some systems supply the negative from a controller output (or with some Club Cars, the onboard computer). Most gas cars use the frame as “ground”. Electric cars do not use a frame “ground”. You can determine the car’s ground point by referring to the correct wiring diagram.
So let’s say that we were missing the positive at connection terminal #2. This means either the key switch, micro switch and/or accelerator switch is open or out of adjustment.
NOTE: Be aware that some cars use the key circuit as a negative circuit and adjust accordingly as per the correct wiring diagram. You will need to trace voltage to each individual component in that circuit and determine where the voltage is lost.
If your car uses the diode in the solenoid system, make sure you make the proper connections and orientation as the diode is polarity-sensitive!
Secondary Circuit (power)
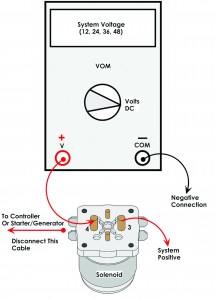 1) The solenoid does “click” and the car will not run. Disconnect the cable from terminal #4 and lay it aside. Tape the end so it doesn’t come into contact with any part of your car. Cable 4 will be the load side of the solenoid that connects directly to the controller/motor circuit. If the car uses a 250-ohm resistor, remove and tape the end of that as well.
2) Place the positive lead of the voltmeter on the vacated #4 terminal. Place the negative lead of the voltmeter to battery #6’s negative post. Activate the system. If your voltmeter does not display system voltage, the secondary circuit’s contacts are defective and the solenoid will need to be replaced. If you do read system voltage on your voltmeter the problem with your car is somewhere in the controller, motor, wiring/cables, shifter and/or input control, such as an inductive throttle sensor, potentiometer, or v-glide.
3) Solenoid does not “click” and the car runs all the time with the key on or off. Connect the voltmeter as per step number two. If you read system voltage without pushing the accelerator pedal and key off the solenoid is defective. This means the secondary contacts are stuck in the “on” position and the solenoid needs replacement.
Safety
1) Raise the rear wheels off the ground using the proper support stands BEFORE you begin your solenoid testing.
2) Disconnect the battery/battery pack when required for testing. If the car is a regenerative system, place the run/tow switch in the tow position before you disconnect the batteries.
3) If you have a proclivity towards being a pyromaniac, make sure you know where the closest fire extinguisher is!
4) Use extreme caution with higher voltage cars as severe burns can occur by accidentally shorting out connections with a hand tool.
5) Solenoid testing should be done in a well-ventilated area and extreme caution used around the batteries as hydrogen gas may be present.
6) Keep all flames and sparks away from the battery compartment and keep battery acid away from your skin and eyes as this can be a irritant.
There you have it! The solenoid is not some complicated mystery. Just think of it as just any other switch you may encounter that it is electrically activated.


